 |
|
|
|
My first stop to learn more about getting the perfect glide was at Sportshaus in West Bridgton. Sportshaus is owned by Marlise and Phil Libby. Back in 1979, after realizing they’d had enough of city life in New York, the Libbys headed north to their vacation home and purchased the ski shop from Hedi and Monell Needham. It didn’t snow their first year in town. Marlise says Pleasant Mountain Ski Area was open for seven days only. Their second year the mountain was open for 26 days. Fortunately for the Libbys, equipment was installed in the fall of ’81. As it turned out, the winter of ’82 was one of the snowiest winters on record according to Scott Andrews, curator and research director at the Ski Museum of Maine. About that time Brian Fox joined
the Sportshaus team as a ski technician.
Interesting to note, Brian is the son-in-law Brian remembers those early years of Alpine ski tune-ups. “The machinery was different,” he says. “All we had was a glorified giant belt sander.” “And a file,” adds Scott Hendricks, who joined the Sportshaus team twelve years ago. To leave your Alpine skis for a tune-up, you must complete a form that simply asks for your name, address, phone number, height, weight and level of skiing expertise. It sounds easy enough, but ski tuning is a science. The ski techs begin by looking at the ski, how it’s used and diagnosing its
problems. They always start with the
edges, sharpening for a 90° angle. Next
they bevel those edges, ranging from zero
to five degrees or more. Recreational skiers
don’t need as much of a bevel as racers or
better skiers who are more aggressive. A For base work on the structure of the ski, the techs turn to their $50,000 Grindrite machine. Grooves or gouges are typical on most skis. In many cases, light grooves will not adversely affect performance. The Grindite exposes fresh base material and removes fine scratches that may inhibit performance. Brian notes that like everything else, this equipment is becoming greener. “Years ago emulsion in the water—the cutting agent, coolant and lubricant— should have come with a skull and crossbones symbol.” Today, he says, it is all biodegradable. Even the cleaners used before waxing are citrus based. Next, the base edge and material on it are checked for flatness. If anything is above the edge, Brian says, “You’ll get a squirrely, wobbly feeling.” As skis become wider, it’s more difficult to get a truly flat base edge, but that’s what these ski techs strive for. They polish the skis for a smoother running surface and make sure that edges are sharp. Finally, the skis are ready for the stone
grinding machine, which can bring new
life into them. “This is where the money
happens,” says Brian. Stone grinding allows The final step is hot waxing, which protects against damage. Wax is what enables the ski to glide better, slide better and it makes lateral movements easier. Preparing skis for racers is much more
involved. Finishing touches are done by
hand edging and hand waxing. Once
racing skis are waxed, they must sit for
24 hours to ideally allow the wax to
permeate into the base. After the first coat,
nine additional coats of wax are added.
Following each coat, excess wax is scraped
off since glide comes from wax that’s been
absorbed and isn’t sitting on the base. Then
brushes are used—from aggressive nylon
or bronze down to softer horse-hair--to At Sportshaus, they offer four different tune-up packages ranging from a basic sharpener/wax job for $20 to a full tuneup, which gets you as close to a factory finish as possible at $35. My second stop in learning how
to achieve the perfect glide
is at Carter’s X-Country Ski
Center in Oxford, where David and Anne
Carter have offered groomed trails since
1984. What began as a club because of
David’s long-time skiing passion evolved
into a business that includes renting
and selling Nordic ski equipment. On Since their Oxford Ski Center serves as
a farm stand in the summer months, Anne
took me to the attached greenhouse to
demonstrate waxing techniques for Nordic Anne uses a sponge applicator to
spread Maxiglide, a liquid paste, onto
the base of the waxless skis. “Wipe down
and don’t wipe it all off,” she says as she
demonstrates the movement from top to
bottom. “Maxiglide refurbishes the base.
It’s like a piece of furniture that needs
oil.” This is a do-it-yourself project that Racers take waxing to a whole different
level. It’s a science of creating just the right
mix of waxes to make the ski go faster.
Kick wax is a sticky wax lightly applied
to either side of the center groove in the
kick-zone of waxable classical skis. It’s
labeled for varying temperature ranges— the warmer the temp, the stickier the wax A bar of hot wax looks like a brick and comes in different colors for different uses. For skating skis, ski techs and DIYers always begin with yellow, which is a warm wax. Warmer waxes fill in the pores better, especially with the help of an iron. To apply, the wax is scraped on to the entire base by rubbing it firmly down the length of the ski, again from tip to tail. Anne says that some people apply with a wax iron, letting the heat warm up the wax and drip it on—similar to how Scott applied the P-tex at Sportshaus. Once the wax is applied, Anne then runs a ski iron along the entire base, connecting and smoothing the wax until an even coat is achieved. If you’re doing this at home, don’t use your household iron as you’ll ruin it and may ruin your skis. While one ski cools, the same procedure is followed for the second ski. Returning to the first ski, she gives it
a second coat by simply running the iron
over the wax that is already there. Any
excess wax is scraped off with a plexiglass Finally, the techs take a brush to the skis and remove whatever excess didn’t come off with the scraper. Similar to the Alpine approach, multiple brushes are used depending on the desired texture the skier wants. Classic skis require grip wax in the kick zone or wax pocket, which extends from the heel of your boot to a foot above the top of the binding. Grip wax produces traction by allowing the rough edges of snow crystals to penetrate the wax layer just enough to grab hold of the ski when it is stationary and weighted. It doesn’t prevent the ski from gliding smoothly when already in motion. Hard wax, aka grip or kick wax, is applied in four to five thin layers by lightly “crayoning” it onto the kick zone. Between layers, the wax is buffed in with either a synthetic or natural cork. The friction of the cork warms the wax so it adheres to the ski base, thus keeping the wax on the ski longer. All reconditioning work is carefully done by hand at Carter’s X-Country Ski Center. The cost for a complete hot wax reconditioning is $35. And for the DIYers, they offer a variety of products and recommendations.
|
 Every skier knows that bogged-in-the-mud feeling.
It’s like an invisible moose is sitting on the back of your
skis as you poke along down the trail. Whatever kind of
skiing you do—alpine, telemark, or cross-country—when
your skis feel sluggish or your sharp turns are more like
controlled slides, the odds are your boards need some
reconditioning. By heading into a local ski shop for a
tune-up, you’ll kick that moose off your tail and enjoy
the perfect glide.
Every skier knows that bogged-in-the-mud feeling.
It’s like an invisible moose is sitting on the back of your
skis as you poke along down the trail. Whatever kind of
skiing you do—alpine, telemark, or cross-country—when
your skis feel sluggish or your sharp turns are more like
controlled slides, the odds are your boards need some
reconditioning. By heading into a local ski shop for a
tune-up, you’ll kick that moose off your tail and enjoy
the perfect glide.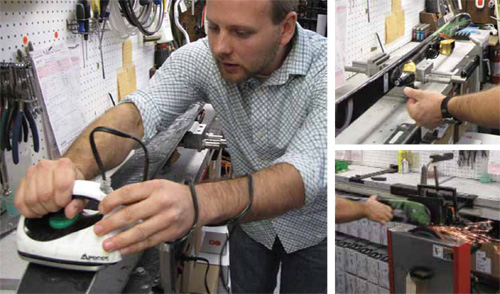 In the early days, skis were tuned with
what was essentially a three-foot belt
sander. It was all done by hand—‑the guys
put pressure on the ski and controlled it.
Today, they use a Grindite 2100 stonegrinding
machine to give skis a factory finish.
In the early days, skis were tuned with
what was essentially a three-foot belt
sander. It was all done by hand—‑the guys
put pressure on the ski and controlled it.
Today, they use a Grindite 2100 stonegrinding
machine to give skis a factory finish.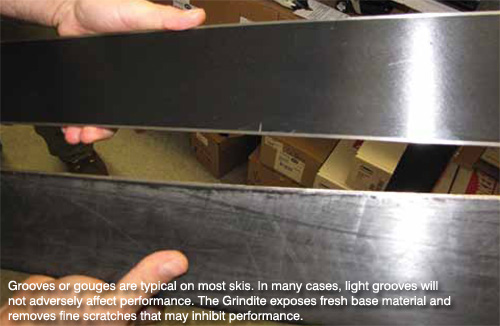 After the grinding step, deep gouges
need to be repaired. If tuning one or two
skis, the candle method is used. Skis are
placed in a vise, base up. A plastic P-Tex
candle is warmed with a lighter until
it drips. Scott carefully fills each deep
gouge with the melted plastic, taking care
to make sure that the flame is blue. A
yellow flame means it’s emitting carbon,
a contaminant. By the time he’s done, the
base of the ski looks like a road surface
with sealant over the cracks. Once the
After the grinding step, deep gouges
need to be repaired. If tuning one or two
skis, the candle method is used. Skis are
placed in a vise, base up. A plastic P-Tex
candle is warmed with a lighter until
it drips. Scott carefully fills each deep
gouge with the melted plastic, taking care
to make sure that the flame is blue. A
yellow flame means it’s emitting carbon,
a contaminant. By the time he’s done, the
base of the ski looks like a road surface
with sealant over the cracks. Once the Anne begins with waxless skis, which have a grip pattern carved or molded into
the base material. This texture bites into the
snow to provide grip for the kick portion
of the classic ski stride. Because waxless
skis have a built-in kick there is no need for
a grip/kick wax. There are times, however,
when the snow is wet and sticky and can
clump or ice up on the base of the ski. That’s
when you know that the proverbial moose
is riding on your tails. It’s time to wax.
Anne begins with waxless skis, which have a grip pattern carved or molded into
the base material. This texture bites into the
snow to provide grip for the kick portion
of the classic ski stride. Because waxless
skis have a built-in kick there is no need for
a grip/kick wax. There are times, however,
when the snow is wet and sticky and can
clump or ice up on the base of the ski. That’s
when you know that the proverbial moose
is riding on your tails. It’s time to wax.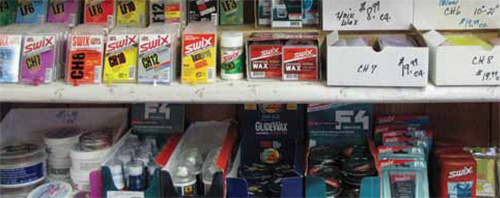
website design - the
nerve
|